 Panting a miniature: EliPanting a miniature: Eli
Again I have selected a Reaper miniature because it was inexpensive and it fits my instructional purposes. Reaper has also made available to us the use of their stock miniature photographs in computer graphics format. You can get a listing as well as pictures of their available miniatures online at their new web site (http://www.rpgspot.com/Reaper/reaper.htm). In all honesty, I had selected this particular miniature prior to their internet presence.
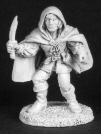 Eli (REAPER miniatures #02022 by S. Garrity) photo used by permission |
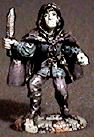 Eli (REAPER miniatures #02022 by S. Garrity) Photo by Jeremy Fowler-Lindemulder |
Examining the miniature, I did discover large pieces of channel flash on the base of the dagger hilt, and under the figure base. They trimmed off easily, and the figure was ready for priming.
Taking into consideration the figure's pose and details in equipment, I decided that a certain "dark," and "skulking," perhaps even "brooding" feeling was in order. Eli hides in the shadows waiting for the unsuspecting to come near. An air of darkness will surround my color scheme. Prime this miniature with even coats of flat black. The dark primer will serve to create both deeper shadows, and a darker overall appearance.
Similarly, we shall limit our range of colors to those that are traditionally dark or cool, often graying them when possible. The figure will become a series of dulled highlights appearing from within a shadowy form. Get prepared to do a lot of straight dry brushing.
First we will create our flesh tone. For this you will need to mix a small quantity of special grayed flesh to use as both a foundation and for highlights. Simply begin by mixing some black and white to produce a medium gray. Grays run through a wide range, and you will have to determine exactly how dark you wish to begin. To this gray you will mix an equal part of flesh color and a small drop of blue. Your color will be grayed and slightly darkened. The black and white will neutralize the brightness of the skin, while the complementary blue will further "cool" the skin tone. The resulting color should be flat brushed onto the hands and face area of the miniature.
Next the eyes and lips are painted. Use some of your medium gray and a small spot of black for each eye and mix some red with the base skin color to make it a dull "blush." Once these dry, the skin can be finished by dry brushing the areas with a mixture of black, white and flesh without the blue that was added to the base coat.
For the shirt, use a medium to dark blue and dry brush it on. No flat painting will be used on this miniature's clothing. The darkest shadows should be black. Be sure to use the same blue that was mixed with the base coat of flesh. This will create two color relationships in the figure. The blue will be a complement to the orangy flesh that is used in the highlights, as well as being analogous to the blue mixed in the flesh base coat. Being simultaneously complementary and analogous, you cannot go wrong.
The boots, belt, cloak and the trim at the bottom of the shirt should be lightly dry brushed with a blue violet that is distinguishable from the blue of the shirt. This will strengthen the analogous color scheme with the shirt while keeping the colors in the cool range of our palette. The pants and cloak draw strings should also be dry brushed with blue violet, but mix it with a little of that medium gray to create a neutral color variation.
The hair and leather of the scabbard can be dry brushed with a dark brown. The dagger blade, belt buckle and metalwork on the scabbard should be dry brushed with a mixture of black and silver. These are neutral colors and do not detract from the color schemes when used in small amounts. It is also a good practice to repeat the same colors in several parts of one piece.
All that remains is the base, which is still black and bears a texture. I decided to make it a sort of cobble stone by taking the medium gray, a darker gray and the dark brown from the hair and scabbard above and painting in individual stones. This is easier than it sounds. Just load your brush with a full beaded drop of one of the above colors and touch it to the base. It will create an irregularly rounded mark. Repeat this with each of the above colors, allowing the black primer to separate each separate "dab" with a thin line. Each color should be represented at least three times in your stone work pattern. When it has finished drying, wash the base with black to darken it and bring out some of the texture.
Thus we have the following colors represented:
This figure should now seem relatively dark and murky with accentuated highlights. Still it has clearly defined features and a color scheme that serves to unite it as a whole piece. Do not forget to apply a clear protective top coat before handling on a regular basis.