 Painting a miniature: GwendalynPainting a miniature: Gwendalyn
This miniature has been selected for several reasons. To begin, Reaper is an inexpensive line of nicely detailed miniatures that are sold individually. This figure suits our instructional purposes well. It has good detailing, and it has many little extras as well as folded cloth represented in the metal. Also, as a fantasy figure it is refreshingly non militaristic. Gwendalyn will also be a strong addition to my own figure collection.
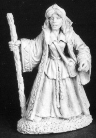 REAPER miniatures #02035 by S.Garrity Photo used by permission of Reaper Miniatures |
 REAPER miniatures #02035 by S.Garrity Photo by Jeremy Fowler-Lindemulder |
The first step after removing the figure from the package consists of checking the figure for flash and damage from shipping. My specific figure had very little flash to begin with. Through careful scrutiny, I managed to locate the casting line created where the mold separated; but, it was so understated on the figure' s surface that I had no flash to clean there. Under the base was a little extra metal left from the casting channels. This trimmed off easily. Unfortunately for Gwendalyn, she was shipped a bit roughly and the end of her staff was slightly bent. A firm yet gentle thumb and forefinger applied to the end of the staff slowly bent it back into the proper position. The figure looks good.
The second step is priming. An even coat of flat white primer was applied to all facings of this figure including the bottom of the base. I am not entirely sure what metals are used in Reaper's castings, but when there is no note to the contrary, I assume the presence of lead. Priming the bottom as well as the top effectively seals toxic metals inside.
Now that the automatic stuff is over with, a color scheme must be selected. Color selection is a personal thing, but some basic rules can be applied here as well. Rules can spark creativity as well as inhibit it. It is the lack of formal structure that often dooms the uninitiated to failure, and too many choices can make the novice balk at the challenge.
I started with a whim, and expanded upon it. In her robes, Gwendalyn looks fairly druidic, and the rough covered base only enhanced this feeling in me. From that I decided that her robe should be green, and everything sort of began to fall into place from there.
Gwendalyn also struck me as a bright figure, out under a sunlit sky. Her hood is down, she does not hide. Her stance is open, she strides forward with her foot outstretched. A personality begins to emerge from these emotive factors, and I decided to use a complementary color scheme to accentuate the brightness and openness of this figure. When placed next to each other complements create vivid and bright contrasts, sometimes annoyingly so.
Red is the complement of green. Any figure that is painted primarily in red and green will tend to send two distinct messages. The first is the obvious Christmas color pair, which is unfortunate. The second is a little more subtle, complements clash. People do not wear them together for a reason; they are basically ugly together as clothing. When was the last time you wore orange with blue (on purpose)? The trick is to use the obvious complementary color scheme in a non obvious manner. For this we will rely on a principle known as splitting the complement.
Green is our basis, and red is the complement, but red cannot be used because it makes us think of Christmas and it clashes too much. Looking at the color wheel we appropriate the two colors closest to red, red orange and red violet. The combination of these colors will create our complementary red without ever actually using the color itself. In addition, these two colors are generally analogous, having red in common. Therefore, they create a secondary analogous color scheme all of their own. Clear as mud, right? Just nod and smile, and walk through it on the color wheel included in the last article. After a few miniatures you will begin to see the patterns, and begin to invent your own.
We begin painting by entirely flat brushing the miniature. It is not enough to just apply the paint, it must be applied neatly. For this reason a small brush, perhaps a 0 size or smaller, should be used.
Also noticeable is the lack of control of the brush at certain angles. It is much easier to make a smooth edge line while looking down directly at the brush tip than when the brush hairs themselves obscure the intended painting area. Always use the very tip of the brush along edges.
Over painting is also sometimes unavoidable. Make sure that overage is only on surfaces that are primed only, and repaint mismatched areas during this stage to avoid difficulty later.
Above all, watch how the miniature is handled. Uncoated paint can flake off on rough hands. Some people go as far as to glue the base of the miniature to something larger before painting. This helps by providing a handle to grip, but it can also get in the way if it is too large. Well painted miniatures are painted from all angles, including the bottom. It does little good to have great paint from above, if there is nothing but primer under the arms. Gently turn the miniature around and over as it is painted to ensure each area is properly covered.
Specifically start by painting the inmost parts of this figure and work to the exterior layers of clothing. Flat paint the skirt and shirt collar red orange, and the blouse and snood red violet. (A snood is the cloth that covers her hair, now you know.) Continue flat painting her pouch and shoe brown and her staff black. Her robe, belt and the base are "hunter" green. If your green is too bright, add a bit of black to darken it. To finish the color scheme, paint her hair bright red, and the trim on her robe as well as her tiara gold. The gem on her tiara is of course green, but you can make it red too.
Her skin is a little more complicated. Since we are flat brushing at this point, the skin tones applied at this point will function as skin shadows. Take some peachy flesh color and mix a small dab of blue into it to produce a realistic shadow color.
If you have no specific flesh color, you can mix it. Start with orange, and add a dab of red. Now mix in a lot of white with just a hint of blue. Renoir pointed out that skin is orange, not red. Blue functions as the complement of orange, effectively browning it. Red helps in variations of the hue, and the white lightens the mixture to the proper brown ranges. The darker you want the skin, the less white you need. It may take a few tries to get the proper ratio, so buy a bottle if you are easily frustrated. Either way, her base coat of flesh color will be slightly blue.
For her eyes, take a very small clean brush and load a small amount of fresh white on the very tip. With the brush at a slight angle, dab a small almond shaped eye where one is sculpted. If you go over the edges, do not panic. Most of us still go over a little bit. Use a little bit of green for the pupil, this time using a vertical stroke. She may look a bit bug eyed now, but we can fix that with the next coat.
By now everything should be neatly flat brushed. Look the miniature over for competent edge work. Is every area neatly covered with no over painting or primer visible? Take the time to touch it up now. Congratulations, that was coat number one.
Observant painters will notice that I inserted three more colors into our scheme. Never fear, brown and black can be added almost anywhere on a figure because they are basically neutral in color. Gold is a little touchier; however, gold is primarily a sparkly yellow brown. Sparkles are neutral, and so is brown. As a matter of fact, the gold and brown are fairly analogous. The only questionable element in the gold is yellow which is analogous to the green and along with the green it forms the split complement for the red violet. Take a moment to check your color wheel.
So far we have these colors:
It is now time to begin adding depth to Gwendalyn. We will begin with the gold trim. To bring out the detail in the gold, make a black wash that is half water and apply it with a small brush tip to the gold trim and tiara only. That is all of the washing we will do on this miniature. When it dries, the wash should leave the gold with an antique look, with the detailed crevices darker than the raised flat areas.
Next we will dry brush most of the figure's surfaces. Start with the red orange, red violet, and brown and make a slightly lighter tint of each by adding a little bit of white to each of them individually. Dry brush these tints over the ruffled surfaces of their respective areas. It helps to dry brush against the flow of the lumps in the metal surface. In this case, strokes should be horizontal. Be careful not to get any of the pigment on other areas. If the dry brushing gets on the wrong surface, repaint the first coat in that area before continuing.
The Staff should be dry brushed with brown and the cloak and belt should be dry brushed with yellow green. Her hair should be dry brushed with red orange and then re-dry brushed more lightly with orange.
Her skin is a little more difficult. It should be dry brushed with unblued flesh. Her hands are a simple matter. The eyes are probably too large, and a semi dry brush should be used to fix them. Mix the tiniest bit of orange red with the flesh to color her lips and finally paint her eyebrows orange red.
Now everything except the base is painted. The base should already be a dark green. Mix a little yellow into the original green, and dry brush the base. Mix a little more yellow into the mixture and dry brush it again. Now take the tip of a very small brush and dab little red violet flowers on top of the dry brushing. You are done painting. Let it all dry.
In order to preserve your work you will want to spray the figure with some sort of sealant and allow it to dry before handling.