 Portrait
PictorialPortrait
Pictorial
Portrait
PictorialPortrait
PictorialPortraits? It is the creed of beginning artists everywhere: "I can't draw people." It is this basic statement that makes me the most angry. It is the "I cant."
Maybe you do not draw people, or perhaps you lack practice, but I am here to tell you that you can. It seems silly to take so many things in our society for granted, and still say that there is something so simple that is beyond your ability. In a world and culture that has placed people in space, on the moon, and has even mastered the flush toilet, a piece of paper just does not seem intimidating. To find it so, seems comical. And so, here is the scoop on a basic portrait.
 Here is a basic diagram of the classic proportions of the
human head. the most common mistake when starting out is to place the
eyes too high. The eyes are typically the half way point of the head
with hair sometimes adding even more bulk on top. Half way between
the eyes and chin is the normal location for the tip of the nose. The
mouth is then usually located half way between the tip of the nose
and the chin. The ears tend to line up with the tip of the nose and
the eyebrows or eyes.
Here is a basic diagram of the classic proportions of the
human head. the most common mistake when starting out is to place the
eyes too high. The eyes are typically the half way point of the head
with hair sometimes adding even more bulk on top. Half way between
the eyes and chin is the normal location for the tip of the nose. The
mouth is then usually located half way between the tip of the nose
and the chin. The ears tend to line up with the tip of the nose and
the eyebrows or eyes.
The width of the head when viewed straight on is normally measured in "eye widths." In this diagram, five eyes would fit end to end across the face. The tip of the nose is normally about one eye width across, while the mouth tends to measure 1.5 to 2 eye widths across.
Hairlines differ greatly, but a good reference point to start one is about half way between the top of the head and the eyes.
|
|
All eyes are different. Even on the same face, both eyes can often look radically different. There is beauty in symmetry, but it perfectly mirrored eyes can be rather boring. This diagram shows some basic points of interest that are shared by many eyes. The manner in which the eye that you draw differs from this diagram will create some uniqueness for your own picture. |
|
This nose example is also very straight forward and generic. Note the shapes of the nose are best shown through careful shading, not big chunky lines. For some reason many beginning drawers like to outline the nose as if the subject were a jack-o-lantern. Please also note that the nostrils are extremely dark inside, and are not round. Leaning, slanted, tapered or even oval are better than round. Round holes in the face will read as "piggy." |
|
|
|
Just as eyes and noses are unique, so are mouths. This diagram shows a pair of lips lit from above, leaving the top lip looking darker than the lower. Often the upper lip curves down in the center, crating the cupid's bow effect. Although this diagram does not show teeth, please note that teeth have very specific shapes themselves. Refrain from separating teeth one from another with dark lines, since this will cause the "spinach" effect. |
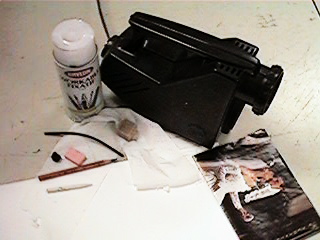
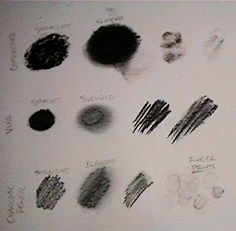
Portraits can be done in any medium. Charcoal has been chosen for this one because it is easy to manipulate, and quick to apply. Here we have some basic portrait materials along with some helpful tools. Charcoal is basically burnt wood, and it can get very messy, so we will want to have the proper materials handy before we need them.
On the table is a small lump of compressed charcoal, a long piece of vine charcoal, and a charcoal pencil (2B) for some detail work. Erasers are also important, since much of charcoal drawing can actually be done in reverse with the eraser acting as a negative pencil. The toilet tissue is there for the purpose of blending charcoal to a smooth finish. The little paper "stump" serves the same purpose but on a much smaller scale. Since fingers contain all sorts of bodily oils that are best left out of the paper surface, it is much better to use the shown tools.
The paper used here is an 80 lb. sulfite drawing paper. It is bright white, heavy weight, and has a good tooth for charcoal. The term "tooth" refers to the overall roughness of the paper. Charcoal sticks best to the paper surface when the paper is a bit rough in a soft feeling sort of way. Smooth toothed paper is not a good choice for this project.
The can is a clear matte fixative spray to help keep the charcoal from smearing once it is in place on the paper in its final version. Also on the table is a little opaque projector. This is not usually necessary, but is shown here because some people might like to try it for their first few portrait attempts. This is an inexpensive one that typically uses a 40 to 60 Watt bulb.
Once again a reference picture is included here. The final picture will differ in many ways, but it is good to have a starting reference to help with the details.
The first step of this drawing is to create a contour line drawing. This was done very lightly with a standard #2 pencil. The lines are just light enough to still be seen by the artist, but not so light that they can be seen well through the charcoal. The less erasing done at this point, the better. Using the eraser on the paper surface will tend to make it rougher still, adding to the paper's tooth unevenly. The key is to make the initial lines very detailed and very light. That way, most of the guess work is taken out later on, and the pencil does not need to be erased. A little charcoal can easily overpower a light graphite pencil line, effectively hiding it altogether. It is at this point that some may wish to use the opaque projector.
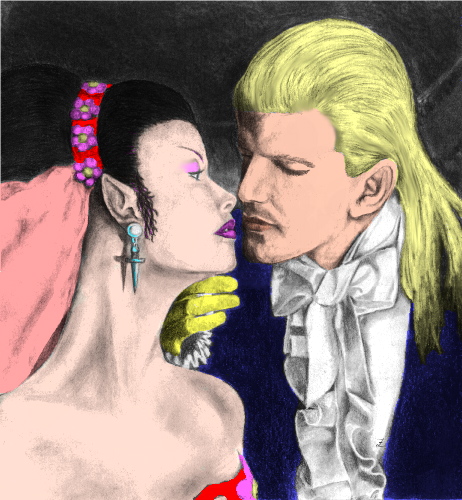
Once the basic contour line drawing is completed, it can be altered. The main alterations in this image are both subjects hair and hairlines.The bride's veil has a different top, and the groom now wears gloves. The bride's ear and ear ring are the most noticeable changes. The reference picture was used for the initial contour line drawing and these details were redrawn over top of the old ones.
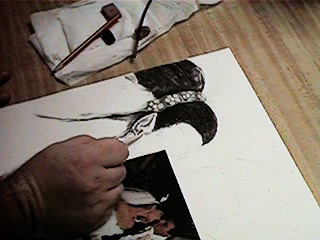
Being right handed, I began adding values in charcoal from the upper left corner. This is a habit of mine and not a strict instruction of any sort. The picture could be just as easily completed upside down as right side up from this point, and I did find it necessary to rotate the picture surface several times to reach central picture areas without smudging previously applied charcoal on the outer edges.
Note that charcoal has very different looks depending on how it is applied. The shading on the figures' skin was done almost entirely indirectly by first applying charcoal to a small blending stump and then carefully burnishing it onto the paper surface with small circular strokes. Straight strokes might have made them look rather hairy, the circular motion tends to eliminate surface line more easily.
An eraser is another necessary tool. Used gently, an eraser will blend charcoal very well. Used more aggressively, it lightens and can often create the feeling of a paint brush.
The nicest thing about charcoal is it blends and smudges so easily. The worst thing about charcoal is it blends and smudges so easily. Sometimes it can get very frustrating trying to keep one section of a picture clean and unmolested while you are working on another. There is a device called a bridge that is made to support a wrist and hand over the center of a picture. An easier way is to lay a smooth piece of paper over the completed section. Ether way, there may be some need for touch ups before the image is considered complete.
 click this image for original size picture. |
Once completed, the image is sprayed with several light coats of fixative. The bride's hair was then darkened on top of the spray and resprayed. Some artists will use hair spray instead of fixative. I prefer not to cover charcoal with anything that might contain water. Here is the competed wedding portrait of DeVia and Sir Askelon. This version is in black and white. The final internet version was colorized using standard image alteration software. Once scanned, this picture was placed in a burgundy mat and shrink wrapped for protection. |