 Picture
Pictorial Picture
Pictorial
The number one question that I receive is, "How can I
meet DeVia
Dirkdancer?" Yes, I know her, and yes, she is famous,
but it is not so easy to get to see her. So for those of you
who have dropped by the studio, here is a basic tutorial on
how to get together with everyone's favorite half elf.
We begin with the basic materials. All of them are black
and white media today. There is no use confusing the issue
with color yet. After all, this is many people's first
time.
|
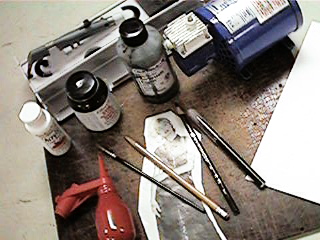
On the table we have a Masonite cutting board, an Aztek
3000 airbrush, a W. R. Brown Speedy light weight air
compressor, white Apple Barrel acrylic craft
paint,Classic nonflammable rubber cement, black Dick
Blick air brush ink, a stock picture from a fashion
advertisement, a Blitzer & Inkworx Air Art gun, a 00 paint
brush, a standard Integrity #2 pencil, a black
Prismacolor pencil, a Blitzer & Inkworx Air Art
brush pen, and a standard piece of 80# smooth tooth bond drawing
paper. These supplies and others similar to them can be found at most
art supply stores. Not shown here is a standard craft knife with an
x-acto #11 blade, and the use of a copy machine. The key to a
good image is knowing how to use you materials, and having the proper
supplies on hand.
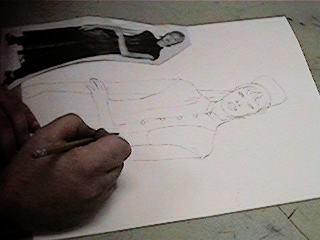
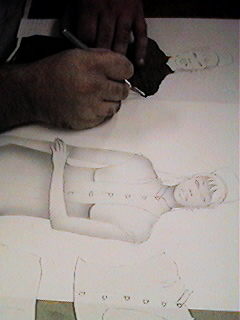
Here the paper has been cut to 11" x 14", and a light contour line
drawing is created from the original using a standard #2 type pencil.
The model is used only for body proportion and placement reference.
Some of the original image has been deleted while other parts are
accentuated, and DeVia's facial features have been superimposed and
added to the face. The pencil line is kept relatively light at this
point, but is made dark enough to create a few good copies. No
shading is included at this point. As far as creating a contour line
drawing, that is a full process in itself, and one can only get there
through practice.
When the line drawing is completed, 3 copies of it are made on
8.5" x 14" white paper for use as masks.
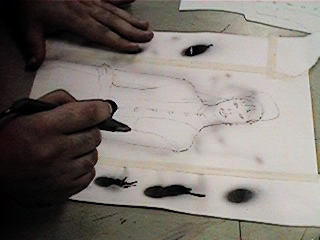
Using the cutting board and a #11 blade, the first mask is cut.
This is a general skin mask with a few details left in. Areas blocked
out in this step are:
- Entire background, including the area between her right arm
and body.
- Her lips, eyes and hair.
- The stencil is also cut into pieces to include her face, both
arms and both breasts. These will be used separately as specific
overlays while the other masks are left in place.
Rubber cement is carefully used to apply all mask elements. It was
brushed on the back of each piece and allowed to air dry most of the
way before each part was pressed into its own specific place. Since
the paper is wider than the copy used for a mask, extra paper is
taped to the sides to protect the background.
Using an airbrush and black pigment, each part of the initial
general mask is properly shaded. All masking elements are then
removed, revealing the basic shadows on the figure's skin.
The next step will involve detailing the clothing, and another
mask is cut. This second mask will block out all non-clothing areas
(including the slightly open space between the breasts), and be
further cut to include the darker central stripe of the outfit.
Again the main mask is carefully applied with half dried rubber
cement to hold it in place, and the main dress is airbrushed over the
original picture. With a relatively fine line, some of the clothing
shadows are airbrushed in as well, and the shadows under the breasts
are softened.
The darker central stripe of the clothing is created by further
masking the sides of the dress, and darkening the central area using
an air gun to splatter the ink from a felt tip marker. This tool will
add a rougher textured look to that part of the image.
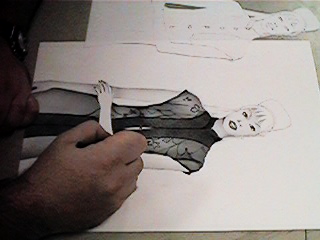
Once the shading on the clothing is airbrushed, the stencils are
removed. A black colored pencil is used to add details to clothing
design and to draw in the specific facial features and finger nails.
Not everything needs outlining, but there are several details that
can be added at this point.
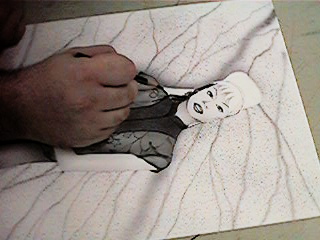
A mask is cut from the third copy to protect the entire figure,
including the still undrawn hair. Since the hair will be covering
over some of the other picture elements, we have left it for
later.
Again the protective mask is applied using partially dried rubber
cement. Extra care is taken in applying this mask so that it will not
damage the already mostly completed colored pencil areas.
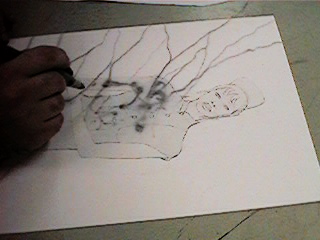
With the protective mask applied, the background is quickly air
brushed in. For a marbleized look, the brush was set on various fine
line settings and random wild slanted strokes were made.
A shadow cast by the figure was also added to the background along
the left side, including the space under the figure's right arm. This
shadow is soft, but generally consistent with the shading already
rendered in the rest of the picture.
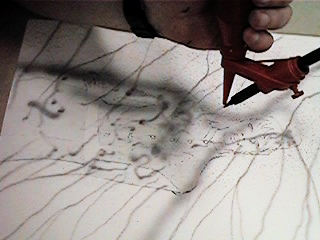
To give the background a grainier appearance, the air gun is again
used with a black felt tip marker. This will also give the background
a slightly darker appearance, making it appear to recede slightly in
space.
The final mask is removed and the hair is drawn in using a black
colored pencil.
With a fine tip brush and some white acrylic paint, some finishing
highlights are added to the little bit of ear ring, and buttons.
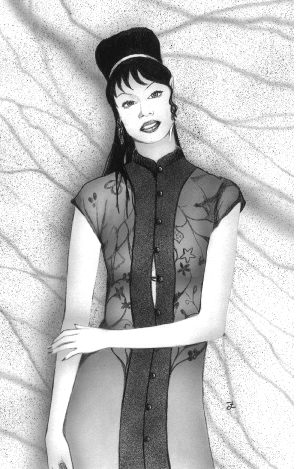
Meet DeVia
Return
to top of page