 Return to the 3D menu |
 Return to the 3D menu |
Before we delve into some more advanced techniques for creating anaglyphic artwork, it may help to explain a bit of how anaglyphs work. Knowing both the process and the theory can often prove useful during those times when you may have to deal with the unexpected.
To understand how anaglyphs work, we first must understand that the image that we see as blue and red lines is really two different pictures. There are two pictures superimposed over top of each other. One picture for each eye. The special colored glasses do two things. First, each lens makes one of the images dark so that one of your eyes can see it well. Second, each lens filters out the other image so that each eye only sees one of the two pictures. It is the difference in the pictures that creates the effect.
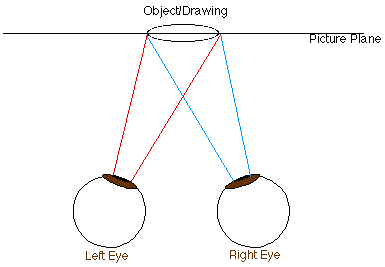
Consider a pen or pencil line drawn directly on a page. Your eyes need to focus on a single spot on the picture plane in order to see the line correctly. Focusing on the picture plane is how most two dimensional artwork is perceived.

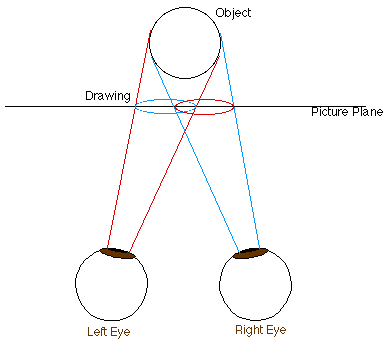
If we think of the picture plane less as a surface on which to draw and more as a geometric plane, we can easily think of objects existing beyond the picture plane. If one sees something three dimensional through the plane, as if through glass, information seen by each eye passes through the picture plane at geometrically predictable points.

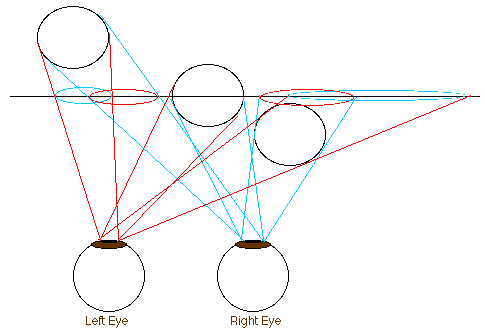
Rather than predicting these points, an anaglyph separation creates them on the flat picture plane. Our own brains reverse engineer the pictures seen into a believable three dimensional image. Notice how the red ab blue lines on the picture plane separate as the object gets farther away. This should look quite a lot like the previous exercise. The distance between the red and blue lines in this diagram is called the shift.

Through logical interpolation we can depict scenes in three dimensions by using some basic and advanced techniques.
The basic rules are:

Go ahead. Try it.