
Return to the Perspective Menu
|
Seeing From a Single
Point
Clear as mud so far? We have looked at some of the basic
tricks and concepts of linear perspective, and a few of the
precepts may have seemed a little daunting along the way.
Fear not, it only gets easier when you work through it all,
which is what we are about to do. For this exercise you will
want to go get the following materials:
- a sharpened pencil
- a piece of paper (8.5" x 11" is a good size)
- a ruler
(a good 12" long ruler - you will need the length).
|
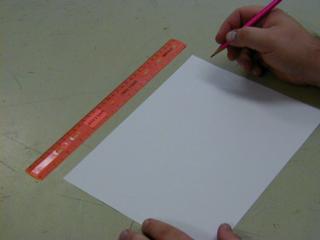
Start by placing the paper on a smooth and flat surface suitable for
drawing. Place it so its basic orientation is horizontal (wide)
rather than vertical (tall). It should look something like this:
Congratulations, that was our first decision. This paper is now
our Picture Plane
(PP). Next we need to establish
an eye level for our picture. We could place it anywhere, with many
different ramifications, but for this exercise we will take it easy.
Eye level will be the center of the PP.
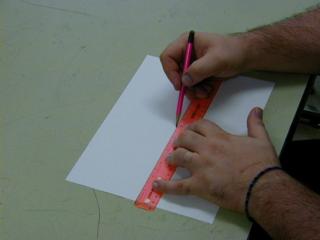
Very lightly draw a straight horizontal line across your paper half
way between the top and bottom. You can use the ruler to measure the
height if you like, or you can just make one that looks close to
accurate. Either way, use the ruler to make it straight. This is now
our Horizon Line
(HL).
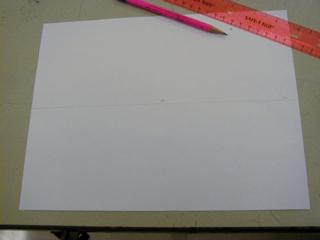
At about the center of the HL draw a
dot. This dot will be our single Vanishing
Point (VP).
We are now fully set up to begin any classic single point
perspective drawing. First, I want to explore a few basic shapes and
conventions, then we will get down to drawing a whole picture using
one vanishing point.
It is usually easiest to construct single point perspective
objects from the front. Once you get the hang of drawing simple
objects, you may want to start from the sides or wherever you please.
For now, we will keep it as simple as possible. Here is the horizon
line with a single vanishing point and some simple shapes lined up
for example. These rectangles, circle, and blob represent the ends of
objects. Think of them as building blocks, we use simple shapes and
objects as a sort of framework for drawing. The more we embellish
later, the more realistic our perspective may eventually look.
These green lines are all lines of
perspective. They have been drawn from each of the inside corners of
the shapes directly back to the single vanishing point. The outside
corners, or corners that point away from the center, have not been
used in this example because we will be making these objects look
like solid forms. The simplest forms to illustrate are rectangles and
squares. These shapes are constructed of vertical and horizontal
lines. Only the lines of perspective are drawn back to the vanishing
point in order to show depth, as if they were protruding into the
page. The two shapes in the lower right corner are present to
illustrate that any basic shape can be utilized in this manner. The
rules do not change, but it helps if we redefine them when dealing
with objects that are not entirely square.
For rounded objects, where there are no corners to draw lines of
perspective from, we instead use tangent lines. A tangent line is one
that only barely touches the outside edge of the shape. It you
continue such a line past where it touches the circle, it does not
enter the circle. The simplest way to draw a tangent line is to place
the point of the pencil on the vanishing point, move the ruler up to
it, and use the pencil point as a pivot to move the ruler around
until it just barely touches the circular shape. The line is then
drawn down the length of the ruler from the vanishing point to the
circle.
With irregular objects, look for corners. Like rectangles, you
draw lines of perspective from each inside corner to the vanishing
point. Try to work with the shape of the object and notice any
corners that may need short lines on the side of the object opposite
from the vanishing point. With a single vanishing point, this just
takes some practice.
With each object above, note how they each travel all the way back
in space as far as you can see. It is like an explosion of infinitely
long objects from the center of the page. Single point perspectives
tend to have this sort of explosive look.
Here the basic shapes have been finished with end lines and all of
the extra stuff like the horizon line, vanishing point, and over long
lines of perspective have been erased. Note that objects wholly below
the horizon are visible from the top and side. Objects above the
Horizon are visible from the bottom and side. And, objects that cross
the horizon show neither top nor bottom. In a single point
perspective, objects in front of the vanishing point show no sides at
all.
The lines used to make the objects shorter than their stretch to
infinity in the green lined example above all have the same angle as
the shape on the front end. So, lines that are vertical on the front
of the object are drawn vertical on the back end as well. Horizontal
lines behave likewise. Curves follow the same rule. All angles are
replicated front to back. By essentially closing off the lines of
perspective, we have turned some basic shapes into some basic
forms.
So, what are some practical uses for single point perspective?
Consider the following example.
Here is my 8.5 x 11" sheet of paper. I have highlighted the
horizon line and vanishing point for illustrative purposes. Normally
these lines should begin very light so that they may be easily
erased. I have drawn some rectangular shapes on the surface
reminiscent of a big city skyline. Now, to use some lines of
perspective.
By placing lines of perspective and erasing parts of the
rectangles that are blocked by the shapes that are visually in front
of them, the illusion of depth is created.
At first, it still looks rather blocky, so we embellish these
basic shapes with detail lines creating textures. A city skyline
emerges, all from one vanishing point. Notice that all the vertical
and horizontal lines remain vertical and horizontal on the front
faces of the buildings, but all the lines going back in space on the
sides of the buildings point in the exact direction of the single
vanishing point.
|Return
to top of page|